The connection manager visualiser is used to create and configure connections. Multiple connections are supported, either to the same device or several different devices. An appropriate configuration panel is displayed for each connection added. Devices can be connected using:
- Serial/USB, the most common wired connection to an Arduino
- UDP, a network protocol you can use with Ethernet cables or WiFi
- TCP Client, open a TCP connection to a server running on your Arduino,
- TCP Server, host a server in MegunoLink that your Arduino sketch can connect to,
- XBee Series 2 Pro API mode, a wireless network
- File, to replay content from a text file — useful for testing and demonstration
- Loopback, to send commands from a Monitor visualizer for testing your MegunoLink project

Create and configure serial, UDP, file and XBee connections with the Connection Manager
Adding Connections
Click the Add Connection to create a new connection. MegunoLink will create a configuration panel you can use to setup the connection. You can mix and match different types of connection in a project and add as many connections as you like. MegunoLink can process messages from dozens of connections at the same time.

Naming Connections
Each connection includes a title field for naming the connections. When you have multiple devices attached this title provides a convenient way to identify different devices. The name can be any thing that helps you separate the different devices being used.

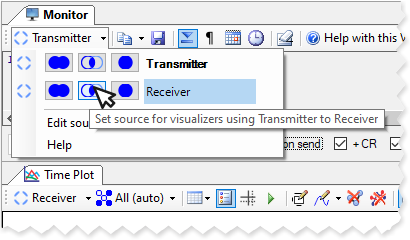
The connection name is used in the connection selector, shown on each visualizer. The connection selector determines the data source used by the visualizer. This means you can change the configuration of a connection independently of the visualizers that it is attached to.

To link a connection to a visualizer, use the connection selection menu on the visualizer’s toolbar. Click the arrow (▼) to open the connection selector. Click the connection name to change the connection for just one visualizer or:
- select
 to apply the new serial connection to all visualizers,
 - select
 to apply the new serial connection to any visualizer sharing the old connection,
 - select
 to update only the active visualizer.
Data from the connection will flow to the visualizer and be interpreted by it. Any messages the visualizer sends will go to the selected device.
Use the Connection button on the connection’s configuration panel, or the button on the connection selection button to open and close a connection.
Reorder Connections
Click the Change Order button on the connection manager’s toolbar to rearrange the order connections are listed.
Use the connection order to help you organize connections; the order does not affect MegunoLink.

SelectChange Order to reorganize the order or sources in the connection manager.
The connection name is used in the connection selector, shown on each visualizer. The connection selector determines the data source used by the visualizer. This means you can change the configuration of a connection independently of the visualizers that it is attached to.
Restore Connected Connections
By default connections are initially closed when a project is opened. If you are using MegunoLink to log serial data or monitor a remote device it can be helpful to include a shortcut to your project file in Windows startup group and start collecting data automatically when Windows starts.
Check the Restore on Load option to automatically open any connections that were connected when the project was saved.


