Many interface panel control properties can be updated by sending commands from your Arduino sketch using InterfacePanel variables. Changing control properties from your Arduino sketch creates a dynamic user interface. Check out our getting started building an Arduino interface guide for an introduction to building interface panels with MegunoLink.
An interface panel hosts a custom user interface that you build by dragging and dropping controls on a design surface.
The content and appearance of controls are also set in the designer, but many can properties be updated from your Arduino sketch as well, including:
- the number in a numeric up/down control,
- the text in a text box,
- the progress value and text in a progress bar,
- a control’s foreground and background color,
- a control’s visibility.

Updating controls from your Arduino sketch can be used to:
- show device configuration in controls for the user to change and update,
- update a progress bar to show passage of a time-consuming task,
- hide/show picture controls to reflect changes in device status, and many more.
Sending Data & Commands from an Arduino
Use an InterfacePanel variable in our Arduino library to send data and commands to an interface panel from your Arduino sketch. After you install the library:
- Add
#include "MegunoLink.h"to the top of your Arduino sketch to include the library. - Create an
InterfacePanelvariable. - Call the
InterfacePanel‘s methods to send data and commands to the interface panel.
You can see the methods available for sending data and commands to a control on your interface panel in three places:
- the interface panel Arduino reference page for a full list of methods available on an
InterfacePanelvariable, - the common control properties and individual control properties tables, and
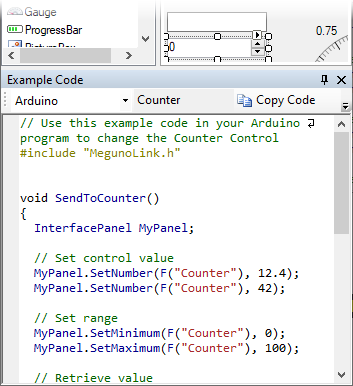
- the example code pane at the bottom of the interface panel designer.
Use the name of the control on the interface panel to identify the control. For example, MyPanel.SetText(F("Status"), "Ready"); will change the text in a text-box control named Status.
You’ll find the control name by selecting the control then searching for (name) in the property window.

The Example Code panel provides examples for sending commands and data to the control selected in the designer window.
The example code below shows sending data to a gauge named Voltage, a numeric up/down control named Counter and hiding a picture box named Status_G.
|
1 2 3 4 5 6 7 8 9 10 11 12 13 14 15 16 17 |
#include "MegunoLink.h" void SendData(float Voltage, int Counter, bool ShowStatus) { InterfacePanel MyPanel; MyPanel.SendNumber(F("Voltage"), Voltage); MyPanel.SendNumber(F("Counter"), Counter); if (ShowStatus) { MyPanel.ShowControl(F("Status_G")); } else { MyPanel.HideControl(F("Status_G")); } } |
Multiple Interface Panels and Message Channels
Use message channels and a MLPUIMessageProcessor component when your project includes more than one interface panel visualizer and you wish to make sure that data and commands send from your Arduino sketch are processed by the right interface panel. This is most important if more than one interface panel contains controls with the same name and you want to send different commands to those controls.
|
1 2 3 4 5 6 7 8 |
#include "MegunoLink.h" void SendData(float Voltage) { InterfacePanel MyTestPanel("Test"); MyTestPanel.SendNumber(F("Voltage"), Voltage); } |
To process commands on a single message channel in your interface panel:
- add a MLPUIMessageProcessor component to your interface panel design,
- set the
ChannelNameproperty of theMLPUIMessageProcessorcomponent to the name of the channel, - use the same channel name in your Arduino sketch when creating an
InterfacePanelvariable.

To set control values from an Arduino program, add a MLPUIMessageProcessor component to your interface design. Then set the channel the Arduino program will use when communicating with the Interface Panel.


