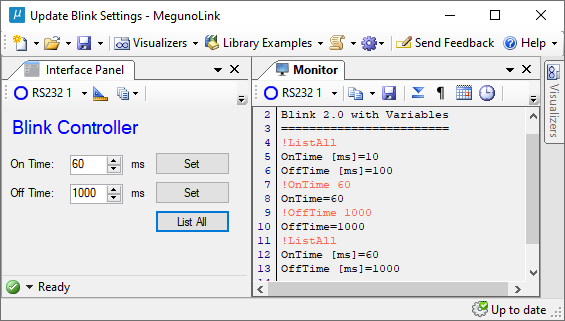
Together, the interface panel visualizer and our Arduino command handler provide a simple method to update variables in your Arduino sketch. Register the variable and its name with a command handler in your Arduino sketch then send !VariableName NewValue\r\n from MegunoLink to update the variable in your Arduino sketch.
For more complex tasks than simply updating a variable value, register a command name and Arduino function with the command handler. Then your function will be called whenever the command is received. The function could turn on a pin, move a servo, or update several variables. See getting started processing serial commands with an Arduino for more information.

Set configuration from an interface panel visualizer. Commands sent are in orange while the Arduino’s response is in black in the monitor visualizer.
You will need:
- a
CommandHandlerin your Arduino sketch, - a variable in your Arduino sketch, and
- an interface panel visualizer with controls to enter the variable’s value and send the update command.
Add a command handler
To create a command handler:
- Add
#include "CommandHandler.h"to the top of your Arduino sketch. - Create a
CommandHandlervariable:CommandHandler<> Commands. - Call
Commands.Process();in yourloop()function.
By default, our command handler supports up to 10 variables. Refer to the Arduino command handler reference if you need more (or fewer) variables.
|
1 2 3 4 5 6 7 8 9 10 11 12 |
#include "CommandHandler.h" CommandHandler<> Commands; void setup() { } void loop() { Commands.Process(); } |
Register the variable
Register the variable in your Arduino sketch with the command handler in the setup() function: Commands.AddVariable(F("VariableName"), Variable);. Substitute VariableName for the name of your variable and Variable with the variable itself. Most variable types are supported. VariableName must not contain any spaces.
Variable must still be in memory when a command is received to change its value. Variables declared at the top of your sketch (also known as global variables), outside any function, are okay. But variables declared inside functions (local variables) generally won’t work, instead your program will crash in interesting and confusing ways!
|
1 2 3 4 5 6 7 8 9 10 11 12 13 14 15 16 17 18 19 |
#include "CommandHandler.h" CommandHandler<> Commands; // Global Variables int BlinkTime = 100; void setup() { Serial.begin(9600); // Ok, BlinkTime is a global variable Commands.AddCommand(F("BlinkTime"), BlinkTime); } void loop() { Commands.Process(); } |
Correct use: variable BlinkTime is global.
|
1 2 3 4 5 6 7 8 9 10 11 12 13 14 15 16 17 18 19 |
#include "CommandHandler.h" CommandHandler<> Commands; void setup() { // Local Variables int BlinkTime = 100; Serial.begin(9600); // Error (BlinkTime is a local variable)!! Commands.AddCommand(F("BlinkTime"), BlinkTime); } void loop() { Commands.Process(); } |
Wrong: variable BlinkTime is local to setup() function.
Add controls to your interface panel
Generally you need an input control for the user to enter the variable’s value and a button to send the value to your Arduino sketch. Controls for entering or selecting values include:
Each control provides a different user experience, so select the one which provides the user experience you’d like to create.
Set up the interface panel to set the variable in your Arduino sketch by:
- Adding the input control of your choice and a button to your interface panel by dragging them from the toolbox onto the design surface (see getting started building an Arduino interface for an introduction to creating interface panels).
- Select the new input control and set its
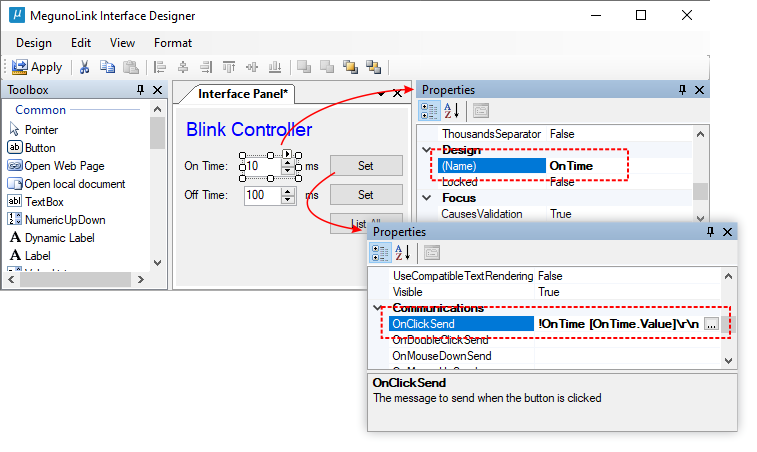
namein the property editor. You can choose any name, but using the sameVariableNamewill help keep everything organized. - Select the new button control and set its
OnClickSendproperty to!InputControlName [InputControlName.Value]\r\n. See creating serial commands for details. - Apply the design changes to your interface panel and test with your Arduino sketch.

Set the name of the input-control and the OnClickSend property of the button control to send configuration values to variables in your Arduino sketch.
Input controls can also send a message when the user changes the value. For example, the numeric up/down control’s OnValueChangedSend sets a message to send when the number in the control is changed. These properties update your Arduino sketch immediately. Sending messages when a button is clicked gives the user more control over changes. Pick whichever method suits your application.


